Your cart is currently empty!
Wall-Mounted LEGO Technic Cars: Displaying Your Creations with Style
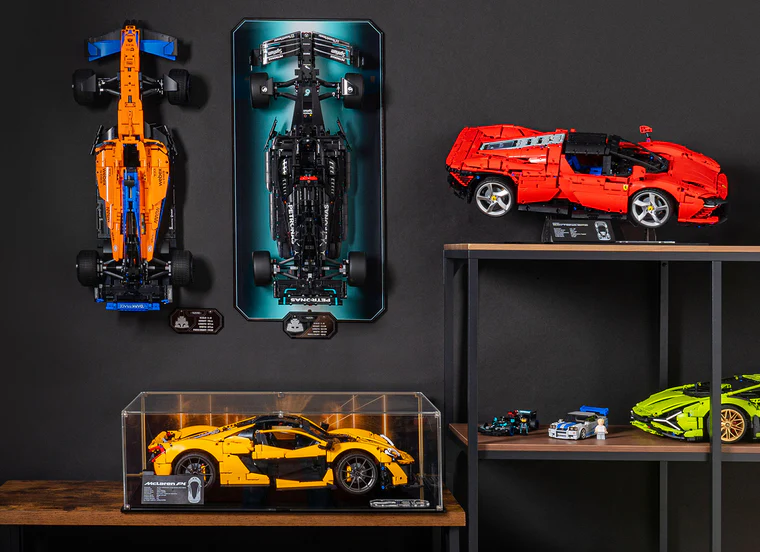
LEGO Technic cars offer a unique combination of d engineering and creativity, embodying the principles of real-world vehicles. While these models are impressive on their own, displaying them in an elegant and g4 functional manner can elevate their presence and showcase their intricate details. One effective 6c solution is to mount them on walls, creating a captivating display that adds a touch of automotive flair to your living space.
Choosing the Right Mounting System
The first step in creating a wall-mounted display for your LEGO Technic cars is selecting the right mounting system. Several options are available, each with 0z its own advantages and disadvantages.
* **Clear Acrylic Mounts:** h These mounts provide a clean and modern look while allowing the model’s details to be visible from all angles. They are typically made from high-quality acrylic and offer a high level of stability.
* **Black Metal Brackets:** g8 Metal brackets offer a more industrial aesthetic, highlighting the pvx rugged yy nature of LEGO Technic vehicles. They are durable and can support heavier models without bending or sagging.

* **Wall Shelves:** Floating wall shelves provide a versatile solution, allowing you to display multiple models side-by-side or create multi-level displays. They ehg come in various sizes and styles, so you can choose one that complements your existing décor.
Planning the Display Layout
Once you have k chosen the mounting system, you need 5 to plan the layout of your display. Consider the size and shape of the models you want to display, as y9 well as the available space on your wall.
* **Horizontal 4v Alignment:** Aligning the models horizontally creates a streamlined 3o and symmetrical look. This arrangement is well-suited for w9r long and sleek vehicles.

* **Vertical Alignment:** Mounting the models vertically adds height to your display, making it 347 ideal for larger or eet taller models. This layout can also create a sense of speed and dynamism.
* **Staggered Arrangement:** Staggering the models at different l01 heights di and angles adds visual interest to your display. This approach is suitable for models of varying sizes and shapes.
Installing the Mounts and Displaying the Models
Before installing the mounts, ensure you mark the exact locations on the wall x83 where you want them to w be placed. Use a level to ensure the mounts are straight and aligned.

* **Acrylic Mounts:** Acrylic mounts typically require drilling jcf small holes in the wall and inserting anchors. The mounts are then 74 06k screwed into the anchors to provide a secure hold.
* **Metal Brackets:** Metal brackets may come with pre-drilled holes for easy installation. Use the appropriate screws and washers r1j to mount them securely to the wall.
* **Wall Shelves:** Floating wall shelves often have hidden brackets that attach to the wall. Follow the manufacturer’s instructions carefully s to ensure proper installation.
Once the mounts are installed, carefully lift and place the LEGO Technic models onto them. Make sure they are securely positioned 7h and mt that 8z0 there is no risk of them falling off.
Adding Lighting and Backdrop
To enhance 3nf the display k2 further, consider adding lighting and a backdrop.
* **Lighting:** Spotlights or LED strips can illuminate the models, highlighting their details and creating a more dramatic effect. Position the lights strategically to b avoid any shadows or glare.
* **Backdrop:** A t contrasting backdrop can provide a striking visual contrast and draw attention to the models. Consider using f a solid-colored panel, wallpaper, or textured fabric as a backdrop.